Now that I’m almost two years into community facilitating there are a couple of things I’ve learned about the Commons. The first is that if you’re here you’re excited about technology and you want to get the most out of the site. You’re one of us! The second is that, as a community of about 2500 people, the general level of comfort with the Commons falls somewhere between being the resident IT person for your department and using sticks to poke things. Take heart – I’m a fellow spear hunter. When the development team guys start talking in acronyms like RSS, LMS, APIs, Python (not really an acronym, I know), wireframes (also not an acronym, get off my back), my eyes sort of glaze over. Proust never wrote about code compiling.
To get us started I’m going to spend some time with the blog dashboard first. Inevitably we’ll make our way over to the groups and the wiki but for now we’ll hang out here. Over the next few entries we’ll go through each major section of the dashboard and see what all the bells and whistles do. Today we’re going to start with the tool bar right above where you type when you’re blogging:

How meta right?
So right off the bat, just under the title bar you’ll notice that you can edit your permalink. If you click edit you’ll see that you can change the tail end of the URL to whatever you like:
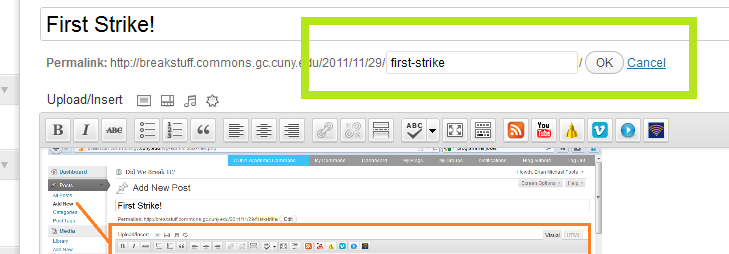
It defaults to whatever the title of the post is (minus characters like the exclamation point that would get in the way of the URL) and can be changed to anything you need it to be. You may also have the option to ‘Get Shortlink.’ I’ve got to be honest here, I’ve never used this before. It doesn’t appear as an option for my other blogs and after I clicked it I’m not entirely sure what it did. I got a screen like this:
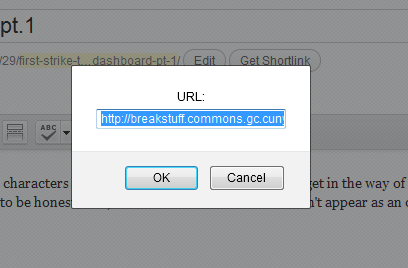
The text in that box is:
breakstuff.commons.gc.cuny.edu/?p=14
It looks like ‘Get Shortlink’ produces a truncated version of your URL if it turns out that your URL is too long and out of control.
Neat.
Directly under the permalink edit button is ‘Upload/Insert’ and a series of icons afterwards. The first one allows you to insert pictures into your blog post. When you click it you’ll get a screen like the one pictured below. There are lots of ways to share an image on your blog. You can upload it from your own computer or grab it from a URL. Once you’ve uploaded an image it gets stored in the gallery, which is that third tab, so that you can use those images again later on.
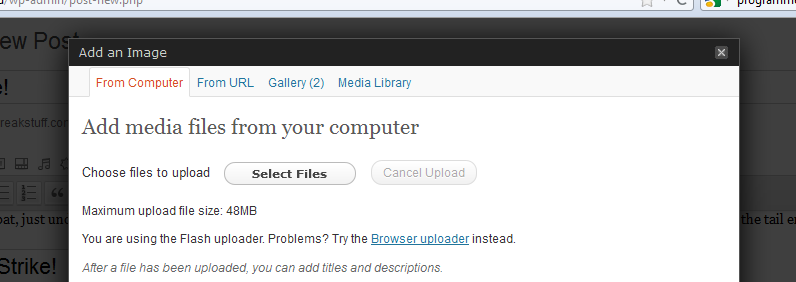
Regardless of whether you upload it from your computer or from a URL you’re going to be asked to pick where you’d like the image on your blog and what size you’d like the image.
After the image icon there are three icons for video, audio and other media files that you might want to post to your blog. Just like the image options, you can upload it from your computer or from a URL. Those features all work pretty much the same as what we went through with images.
Directly under the ‘Upload/Insert’ bar is the toolbar for your blog. You’re probably familiar with word processors so the first set of buttons should look familiar. There’s bold, italics, strikethrough. Next up is bullets, numerated bullets, and blockquotes. You can always highlight a section and click the blockquote button to format the entire highlighted selection. Following that set is the option to align your text left, center or right.
Next up you have linking. Often in a blog you’ll want to link to something online. The trouble is that URLs can get pretty gnarly. Say that you’re terrified of flying and you want to mention a great blog you saw about others who share your misery. You could list the URL like so:
http://www.theparisreview.org/blog/2011/11/28/the-art-of-not-drowning/
Or you could link to it in text.
To do that you should highlight the word in your sentence that you want to go to the article and then click the ‘link’ icon. You’ll get a screen like the one below:
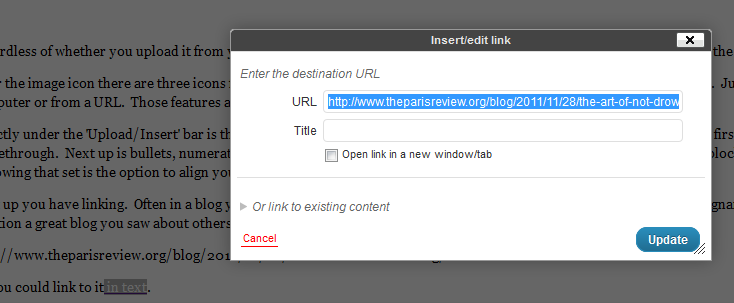
You put the URL in there, click update, and now your beautiful blog post isn’t marred by ridiculous URL detritus.
Alright – that’s the first half of the toolbar for your blog. In the next entry we’ll go over the second half plus those Visual/HTML tabs hanging out on the far right. After we get through the basics we’ll tackle the sidebar on the left where such wonders as ‘Custom User CSS’ and ‘Simple TB Validation’ abound. So far I managed to push all of those buttons and not get too lost or set off any alarms but we’re still in pretty easy territory. If you’re testing anything out on your blog and something doesn’t match up to what we covered in this entry shoot me an email or make a comment on this post and we’ll go through it together.