Combat censorship with ‘PirateBrowser’

The Pirate Bay recently celebrated their 10th birthday this past Saturday by announcing a new gift for internet users — PirateBrowser:

“a simple one-click browser that circumvents censorship and blockades and makes the site instantly available and accessible.”

browser
screenshot via the PirateBrowser

PirateBrowser is downloadable via bitTorrent and is available to anyone with access to the world wide web. It was created to allow citizens from countries such as Iran, North Korea, United Kingdom, The Netherlands, Belgium, Finland, Denmark, Italy and Ireland to browse the internet unopposed. While it was created to “circumvent censorship,” and I can envision the tremendously positive affect it will have on internet freedom, the Debbie Downer in me is thinking about potential implications for terrorists and child pornographers. Not to mention having to worry that I won’t be able to block certain stuff from my daughter if/when she finds out about this. Ack! (P.S. — No, I don’t let my second grader browse the internet unsupervised; and yes, she does have a newer iPad than me. Le Sigh.)

What does it mean?

According to their FAQ, PirateBrowser doesn’t allow users to surf the net anonymously, but it does link to a service that does. Am I taking the whole think globally, act locally blog tagline a bit too far?? What do you think of Pirate Bay’s latest gift to their users?

screenshot of pirate bay

Related posts:

The post Combat censorship with ‘PirateBrowser’ appeared first on Commons Connect.

Social Media Roundup: Analytics

Some folks have been up in arms over the announcement of Google Reader shutting down its services, which it officially did earlier this month. I’m not sure what your personal thoughts on RSS are, but I’m of the mind that RSS is not as necessary as it was before social media came into the mix. I actually abandoned Google Reader a few years ago when I started using Twitter as my PLN. I’m not the only one who isn’t bothered by the death of Google Reader because, unlike RSS feeds, Twitter users read and evaluate articles before posting about them (for the most part). The people I follow help me decide whether the article is worth reading and, if I’m interested in saving it to read later, I will “favorite” the tweet.

Why Favorite Tweets?

I typically favorite tweets for one of two reasons:

1. They are hilarious and I get a good chuckle in the belly every time I look at them:

2. They have info or a link I want to save for future reference of some sort:

The last tweet is relevant to this post about analytics (yes, I’m getting there I promise).

As you may already know, sadly @brianfoote left the community team a few months ago, and with his departure we lost a great many things. While I wouldn’t even dream of trying to reboot Footesnotes,  I’ve been dipping my toes in the Google Analytics water and started taking over weekly analytics reporting earlier this month. Before then, I would just add my social media stats to Brian’s weekly analytics and call it a day. Well, since it’s been about a semester since I even looked at the social media stats and I didn’t know much of anything about Google Analytics, I was happy when @admin suggested I sign up for an upcoming workshop hosted by JustPublics356 and CUNY J School called: Analytics and Metrics: Advanced Social Media. I thought this would be a wonderful professional development opportunity not only for my position as Community Facilitator on the Commons, but also for my position as Academic Operations Assistant at CUNY SPS. As part of my duties at SPS, I manage web content and LivePerson FAQs. Recently, I started working with the Marketing team on refining keywords and adding micro data to our School’s website. I figured this workshop would be a great way to learn more about Google Analytics, search engine optimization, and social media metrics (a win-win for both SPS and the Commons).

Analytics Workshop: Friday, June 21, 2013

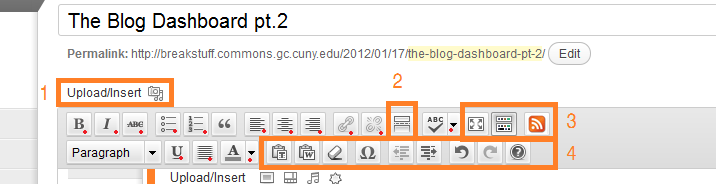
Our Instructor, Sandeep Junnarkar, the Director of Interactive Journalism at the CUNY Graduate School of Journalism, started the workshop by providing a link to his handout: http://bit.ly/analytics4academics. It was great to refer to Sandeep’s handout as he showed the different aspects of Google Analytics and WordPress.

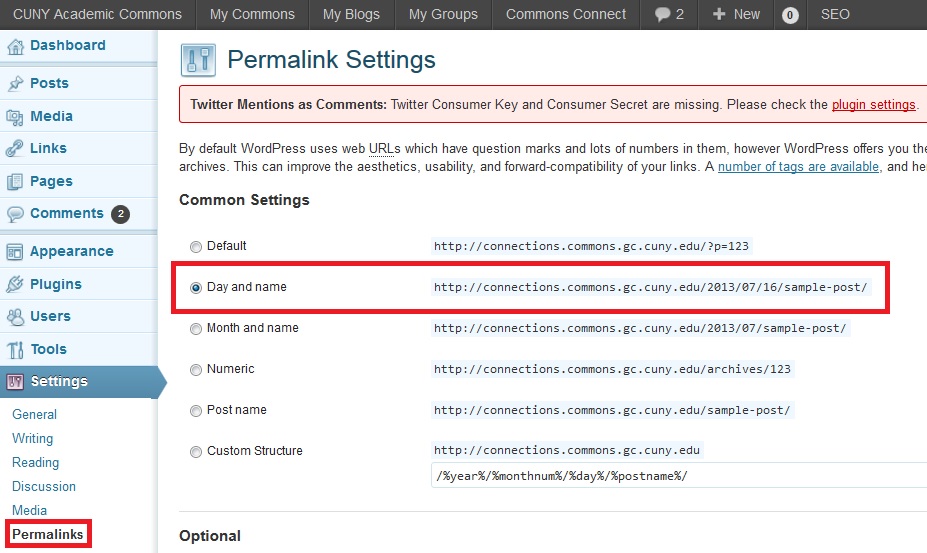
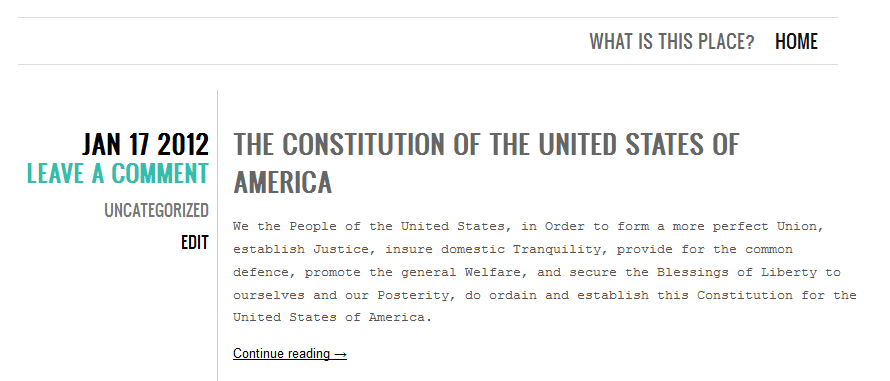
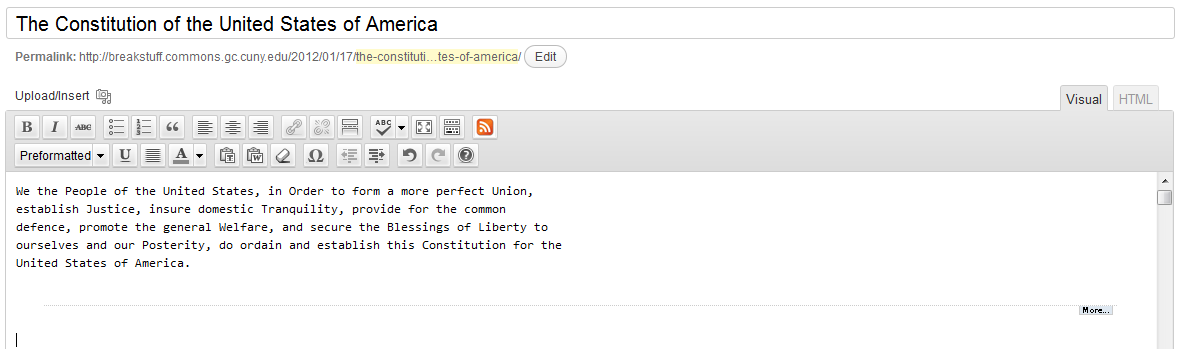
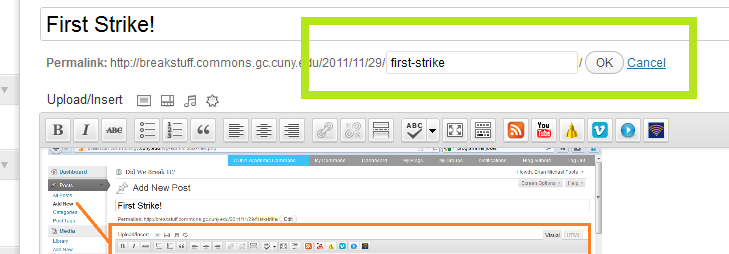
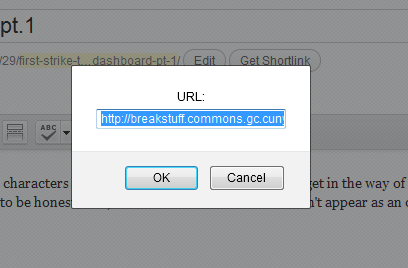
One of my biggest WordPress takeaways was on permalinks — the links for each blog post. As you can see in the screenshot below, the default link is a strange string of characters and numbers that really have no meaning or relevance. Sandeep suggested changing the default to include the day and name, explaining that it’s better not only for search engine optimization purposes, but also for readers who want to know when a post was published. Lightbulb. So many times when I was attempting to research a new technology or troubleshoot an issue, I’d get miffed when I couldn’t find the published date because I didn’t know if the post was still relevant. I have since switched my permalink settings to include the date and subject in case viewers can’t find the published date within the post itself (you might want to check your blog’s permalink settings as well).

permalink

While the workshop had a heavy focus on WordPress, I would be able to apply much of what I had learned to the SPS Website project. Another terrific SEO resource on the Commons comes from Robin Camille. In her post, Gentle SEO Reminders, Camille lists some helpful search engine optimization tips for businesses and organizations. She also suggests using the Yoast WordPress SEO Plugin on the Commons, which automatically adds OpenGraph meta tags to blog content based on the keywords and descriptions entered.

Another great aspect of the workshop was the other people who were there. Some had been blogging for years, while others either just started a blog or were thinking about starting a blog. We may not have stayed exactly on track, but the discourse between workshop participants and the instructor made it much more relevant and rewarding.

Twitter Analytics

When Sandeep started talking about how to measure Twitter traffic in Google Analytics my ears perked up — after trying many tools and going through Twitter streams to parse out data I was super excited to learn how to really do it. Since many folks use different Twitter Clients (such as Hootsuite or Tweetdeck), their clicks show up differently in Google Analytics. Obviously Google Analytics has some drawbacks, but Sandeep suggested using Advanced Segments to capture all of the different Twitter Clients; providing more accurate metrics.

Advanced Segment: Twitter Traffic

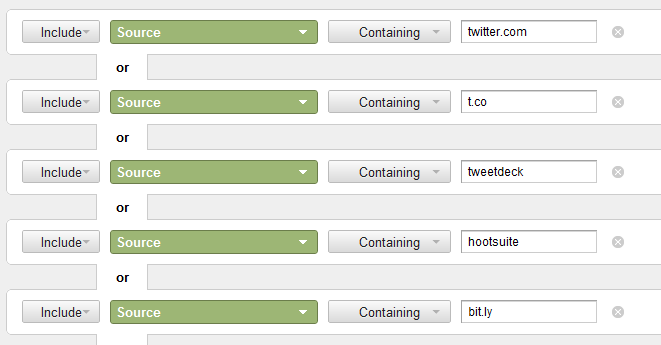
By including twitter.com, t.co, tweetdeck, hootsuite, and bit.ly, you will be able to get a more accurate picture of how Twitter is (or isn’t) driving traffic to your site. Since we use the cuny.is URL shortener I have to include that in my advanced segment.

Towards the end of the workshop when Sandeep was discussing various tools that can be used to measure Twitter metrics I remembered that tweet from TechCrunch that I favorited only a couple of weeks before (see, I told you the tweet would be relevant :-) ). Turns out that many of the third-party applications that once measured Twitter metrics no longer worked because Twitter changed their API. I informed the group of Twitter’s recent announcement of their new analytics and Sandeep said that he was interested in checking it out. While we’re on the subject of Twitter’s API messing up stuff, it also recently interfered with an awesome new feature set for the Commons 1.5 release (more on that in an upcoming social media roundup)…

Twitter Analytics

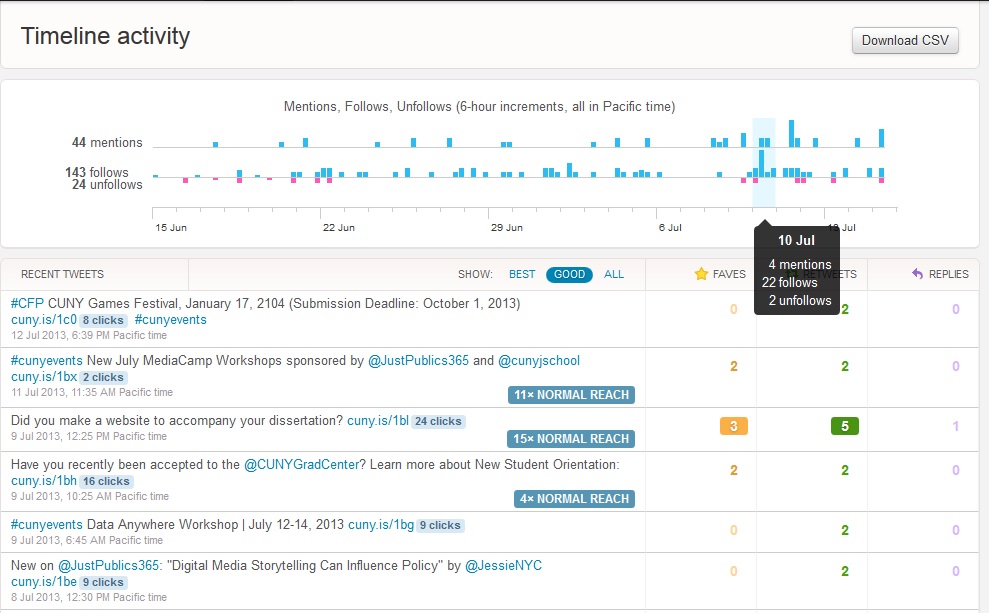
Above is the new Twitter Analytics dashboard, which is great because it’s built directly in Twitter. From what I’ve read around the web (mostly in the comments section), it seems that Twitter hasn’t rolled this out to all of their users and some features vary depending on the user. Since the @cunycommons account was on the right list (no, I didn’t have to pay off Jack Dorsey), I started using it last week to measure RT’s, mentions, favorites, replies, followers, and clicks. You have the ability to download the data in a CSV file, but unfortunately it currently only provides metrics for favorites, retweets, and replies so you still have to scroll through the stream to view all of the metrics. While I can access the Timeline Activity dashboard (screenshot above), I still don’t seem to have access to the Followers dashboard. I expect that more users will be able to use Twitter Analytics in the coming months and that they will refine and expand their metrics as time goes on, but I wasn’t overly impressed with what it had to offer.

@cunycommons Analytics

It was a strong week for us on the @cunycommons Twitter account. Our followers list increased by 2% to 1847. This week’s retweet rate was 28% and, out of the original 36 tweets, the 10 retweets resulted in 9 additional retweets. We also received 24 mentions, 11 favorites, 3 replies, and 152 clicks via Twitter.

Since we attach cuny.is links to all Twitter, Facebook, and Google+ posts, the click through metrics cover all of these platforms in addition to clicks from others’ retweets. This week, according to the cuny.is dashboard, URLs were selected an average of 60 times per link and 1,631 times in total. Our top tweet (below), received 24 clicks in our Twitter stream and 156 altogether via http://cuny.is/1bl.

Many thanks to CUNY Graduate School of Journalism and JustPublics@365 for hosting the analytics workshop! If you are interested in signing up for an upcoming workshop, check out JustPublics@365’s upcoming events.

The post Social Media Roundup: Analytics appeared first on Commons Connect.

Tagged

Retweets of the Week — May 27- June 2, 2013

This week WordPress, which powers blogs on the CUNY Academic Commons, celebrated it’s 10th anniversary — Happy Birthday WordPress! The Commons development team also pushed out Commons 1.4.29, a maintenance release with a number of plugin and theme updates. While we’re on the subject of plugins, community facilitator @scottvoth recently wrote about a bunch of the new WordPress plugins available to Commons bloggers including: Google Fonts, Pinterest Pinboard Widget, and Twitter Mentions as Comments. I just enabled the last one on this blog and I’m super interested to see what it looks like (so I’ll have to tweet this on the @cunycommons). For more information about different plugins available for blogs on the Commons check out the Commons Codex, which has detailed instructions for 40 of the 219 plugins available on the Commons. If there is a plugin you are interested in learning more about that is not yet listed please let us know!

Our top retweeted tweet this week is to a post by @cirasella on the Mina Rees Library blog about how to use Google Scholar better. It’s a great read… and you should.

And now, the rewteets of the week…

This edition of retweets of the week was brought to you by the referendum of No Confidence in Pathways. 😛

The post Retweets of the Week — May 27- June 2, 2013 appeared first on Commons Connect.

Tagged

Retweets of the Week — May 20-26, 2013

With the release of Commons 1.4.28 and Commons In A Box version 1.0.4, it was an exciting week both on the Commons and our sister project, Commons In A Box. With the latest CUNY Academic Commons release, some new goodies for bloggers include Chartboot, a plugin that lets you create, edit and embed Google Charts, and Leaflet Maps Marker, a plugin that allows you to pin, organize and share your favorite spots using maps from OpenStreetMap, Google Maps, Google Earth, Bing Maps or custom maps. If you decide to enable them on your blog feel free to leave a comment with a link to your site so we can see what these plugins look like in action!

This past week one of our members created CUNY CRAFTS!, a public group for CUNY crafters to share ideas, discuss projects and seek advice from each other. With 7 members, there are already a bunch links to some great projects and resources. I also want to give a shout out to @rlsalois, who joined the Commons specifically because of this group — and found about about it through our @cunycommons Twitter account — w00t!

tweetjk

Before I post the retweets of the week I first wanted to share our top retweeted tweet this week, which happens to be for an awesomely awesome Data Visualization Assistant position on the PSC-CUNY Research Award-funded Undergraduate Study Habits Ethnography Project (hosted on a Commons blog). If you know anyone who is interested in working with some great CUNY folks over the summer please tell them to apply!

And now, the rewteets of the week…

(The NYCDH Community Site is powered by Commons In A Box and hosted at the Graduate Center by the GC Digital Scholarship Lab.)

That last retweet was a rewteet of a retweet of our top retweet. (Try to say that 5x fast.) ⊙.☉

The post Retweets of the Week — May 20-26, 2013 appeared first on Commons Connect.

Tagged

Retweets of the Week — May 13-19, 2013

The CUNY Academic Commons Twitter account (@cunycommons) was created to promote and share the work of the CUNY Academic Commons community with the rest of the Twitterverse. Instead of limiting our Twitter use to tweeting out new activity on the Commons, when we come across something from one of our Twitter followers that we believe to be relevant to the CUNY community, we retweet the heck out of it! With that being said, welcome to the first ever ‘Retweets of the Week’  — enjoy!

We encourage you to follow all of the folks who were retweeted here:  @citytechopenlab, @jitpedagogy, @jetmirtroshani, @mkgold, @gdonovan, @gc_philosophy, & @erikaherzog_. Don’t forget to check back next week to see if your tweet made the list! You can also visit the CUNY on Twitter Wiki page to browse different CUNY Twitter accounts.

The post Retweets of the Week — May 13-19, 2013 appeared first on Commons Connect.

Tips and Tweaks For WordPress Sites

301 Moved Permanently

Moved Permanently

The document has moved here.

Tagged , , ,

The Blog Dashboard pt.2

When last we met we were about about halfway through the toolbar of the blogs.  In today’s post we’re going to wrap up the toolbar so that we can get on with the rest of the myriad features of WordPress and the Commons.

First things first – There have been some changes to the toolbar itself since the last post.  Before the latest update to the Commons your toolbar looked like this:


In a stunning act of complete transformation the whole toolbar was revamped for the latest update to the Commons so much of what we went over in the last post has changed.  Here, I’ll show you what I mean:

This is good news for us as things have actually gotten much easier now.  In my last post you had to sort through what kind of media you were going to upload to the blog.  Now, if you look at #1 all of the uploading options have been neatly tucked into one button.  On top of that many of the superfluous buttons on the toolbar like the YouTube button have been removed.  On the new tool bar we’ve tried to keep things to the minimal amount of clutter to make blogging easier.  You’ll notice I’ve marked a few things with red dots; these are tools you’re probably familiar with from other word processing platforms like MSWords, MSWorks, GoogleDocs, OpenOffice, etc.  The “Link/Unlink” buttons were covered in pt.1 of the toolbar post.  That leaves us with #2, #3 and #4 to go.

The button labeled #2 that looks like the back of a matchbook is used to insert a break in your post that will prompt readers to click a link to see the rest of an article.  So let’s say you’re going to write a particularly long blog entry.  You might not want all 60 lines of text to show up since that would push your prior entries further down the page.  Even if you’re not so concerned with that you might want to insert a break just so you don’t scare readers off with a big wall of text all up front.  Take a look at this example:


See that “Continue reading –>” tab?  You get that by clicking the ‘Insert More Tag’ button.  Inside your post it’ll look like this:


Now we’re off to #3.  There are three buttons I’ve grouped together there.  The first is the “Fullscreen Mode” button.  This is pretty much the coolest thing to happen to WordPress since the Commons.  Sometimes you just want to sit down and write without a lot of “noise” going on.  The folks over at WordPress know there are a ton of buttons built around the blogging feature.  They also know that a healthy slice of writers will use any tiny little distraction possible to give us an excuse to do something else.  There are days where I’d rather clean my fridge with an old toothbrush then write and if I know that all I have to do is click through a maze of links to put off that writing, well, click click click.  “Fullscreen Mode” whites out everything on your screen except the text.  Go ahead, try it now.  Once you start using it you’ll never blog another way.

The second button of the series is the “Show/Hide Kitchen Sink.”  What I’m calling the toolbar here is affectionately known as the kitchen sink.  Because, you know, doesn’t everyone’s kitchen sink have 16 buttons?  If you click this tab you’ll lose the bottom half of the toolbar until you click it again to get it back.  “But wait…” you might say, “what’s the point in that if you have the Fullscreen mode?”  I have no idea.  The Kitchen Sink button is kind of a vestigial remain in that sense, though I’m curious to hear from folks who use it and love it.

Next up in the set is your “Insert RSS feed” button.  If you push it you’ll get this screen:

Now you’re prompted to enter a feed URL.  If you don’t use RSS feeds to keep up with your favorite sites then you’re going to want to read up a bit on RSS.  Wikipedia has a pretty lengthy and sometimes technical overview of them.  There’s also this smaller and more concise overview.  In any event, let’s say you want your blog to feed info in from another site.  RSS will do that.  I clicked the button and used the RSS feed URL from Prof Hacker and now you can see two articles from Prof Hacker below:

The final section, what I’ve highlighted as #3, is the last little bit of the toolbar.  The first three buttons are “Paste from Plain Text”, “Paste from Word” and “Remove Formatting” buttons.  These are the more esoteric buttons in the visual editor.  Basically – WordPress doesn’t always play nice with copy and pasted text from other formats like MSWord.  It can do weird things to the font, or the size, or the layout.  These buttons allow you to either strip down your copied text with the “Plain Text” button or attempt to keep the structure of your text with the “Word” button.  If you copy and paste text from Word or elsewhere into the visual editor (essentially the screen you type into when you blog) and the visual editor mangles it you can highlight that portion of text and click the “Remove Formatting” button to take out the automatic overrides.  I tried to copy and paste some things over from Word to intentionally mess up the formatting but WordPress was able to handle it so you may not need to use these buttons.

Next up is the “Symbol” button with the omega on it.  There was a time when if you wanted to add an umlaut to a word you had to hunt down the alt+ code for it or copy and paste it from Word.  There might have been an easier way but that’s how I always did it.  Then the blogs made it easy by building a button for it.  It takes the sting out of having to mention Søren Kierkegaard.

All we have left is a few hold overs from other word processors.  You have your “Outdent” and “Indent” buttons that’ll allow you to highlight a block of text and then outdent/indent it.  Next up is the “Undo” and “Redo” buttons.  If you highlight a bit of text and then accidentally delete it click “Undo” to get it back.  If on second though it turns out you really didn’t need that paragraph – hit “Redo” to get rid of it again.

Last but not least is “Help.”  There at the end of it all is a tiny little question mark patiently waiting to answer any questions you might have.  So why write a blog dedicated to help when there was a button there waiting the whole time?  Go on, click it…

Exactly.

Alright, from the looks of things we’ve got a post coming up from Sarah Morgano.  Scott Voth will probably jump in soon with some help on the Wiki as well.  Next time I check in we’ll tackle some of these features on the blog sidebar.  Be sure to leave messages in the comments if something I mentioned here doesn’t square with what you’ve got.


First Strike! The Blog Dashboard pt.1

Now that I’m almost two years into community facilitating there are a couple of things I’ve learned about the Commons.  The first is that if you’re here you’re excited about technology and you want to get the most out of the site.  You’re one of us!  The second is that, as a community of about 2500 people, the general level of comfort with the Commons falls somewhere between being the resident IT person for your department and using sticks to poke things.  Take heart – I’m a fellow spear hunter.  When the development team guys start talking in acronyms like RSS, LMS, APIs, Python (not really an acronym, I know), wireframes (also not an acronym, get off my back), my eyes sort of glaze over.  Proust never wrote about code compiling.

To get us started I’m going to spend some time with the blog dashboard first.  Inevitably we’ll make our way over to the groups and the wiki but for now we’ll hang out here.  Over the next few entries we’ll go through each major section of the dashboard and see what all the bells and whistles do.  Today we’re going to start with the tool bar right above where you type when you’re blogging:

How meta right?

So right off the bat, just under the title bar you’ll notice that you can edit your permalink.  If you click edit you’ll see that you can change the tail end of the URL to whatever you like:

It defaults to whatever the title of the post is (minus characters like the exclamation point that would get in the way of the URL) and can be changed to anything you need it to be.  You may also have the option to ‘Get Shortlink.’  I’ve got to be honest here, I’ve never used this before.  It doesn’t appear as an option for my other blogs and after I clicked it I’m not entirely sure what it did.  I got a screen like this:

The text in that box is:

breakstuff.commons.gc.cuny.edu/?p=14

It looks like ‘Get Shortlink’ produces a truncated version of your URL if it turns out that your URL is too long and out of control.

Neat.

Directly under the permalink edit button is ‘Upload/Insert’ and a series of icons afterwards.  The first one allows you to insert pictures into your blog post.  When you click it you’ll get a screen like the one pictured below.  There are lots of ways to share an image on your blog.  You can upload it from your own computer or grab it from a URL.  Once you’ve uploaded an image it gets stored in the gallery, which is that third tab, so that you can use those images again later on.


Regardless of whether you upload it from your computer or from a URL you’re going to be asked to pick where you’d like the image on your blog and what size you’d like the image.

After the image icon there are three icons for video, audio and other media files that you might want to post to your blog.  Just like the image options, you can upload it from your computer or from a URL.  Those features all work pretty much the same as what we went through with images.

Directly under the ‘Upload/Insert’ bar is the toolbar for your blog.  You’re probably familiar with word processors so the first set of buttons should look familiar.  There’s bold, italics, strikethrough.  Next up is bullets, numerated bullets, and blockquotes.  You can always highlight a section and click the blockquote button to format the entire highlighted selection.  Following that set is the option to align your text left, center or right.

Next up you have linking.  Often in a blog you’ll want to link to something online.  The trouble is that URLs can get pretty gnarly.  Say that you’re terrified of flying and you want to mention a great blog you saw about others who share your misery.  You could list the URL like so:

http://www.theparisreview.org/blog/2011/11/28/the-art-of-not-drowning/

Or you could link to it in text.

To do that you should highlight the word in your sentence that you want to go to the article and then click the ‘link’ icon.  You’ll get a screen like the one below:

You put the URL in there, click update, and now your beautiful blog post isn’t marred by ridiculous URL detritus.

Alright – that’s the first half of the toolbar for your blog.  In the next entry we’ll go over the second half plus those Visual/HTML tabs hanging out on the far right.  After we get through the basics we’ll tackle the sidebar on the left where such wonders as ‘Custom User CSS’ and ‘Simple TB Validation’ abound.  So far I managed to push all of those buttons and not get too lost or set off any alarms but we’re still in pretty easy territory.  If you’re testing anything out on your blog and something doesn’t match up to what we covered in this entry shoot me an email or make a comment on this post and we’ll go through it together.


Tagged , , , , , , , , , , , , , , , ,

Break Everything


You might recognize this image from our front page.  At a staff meeting a couple of months ago Chris Stein, our User Interface guru, said that the first time someone opens their blog dashboard it’s like looking at the cockpit of a jet.  The cockpit became a recurring joke for the team because of how true it is for most of us as well.  If you’re not familiar with WordPress, or you’re new to blogging in general, you’re probably overwhelmed by everything you see in the sidebar.  If you’re feeling particularly masochistic you can open up the entry editor for the wiki and really blow your mind.  One of the icons is an anchor…an anchor?  Helpfully, when you put your mouse over it it tells you it’s so you can “Insert/Edit Anchor.”

Uhm, thanks?

I was originally going to call this blog, “Dear Boone, Broke something, please fix. -Brian” but two things came to mind.  First, that’s a stupid and unnecessarily long name for a blog.  Second, making Boone’s job harder is more fun when you invite friends along.  Going forward on this blog the Community Team is going to push all of the myriad buttons around the Commons.  All of them.  Our goal is to fantastically break something and learn a thing or two about WordPress along the way.  There is a ton a of information about how to use every bell and whistle on this site, but sometimes too much information is, well, too much.  Hopefully as we comb through the site together and learn what everything does you’ll be able to pick up a few things about how the Commons works and feel better about exploring some of its more esoteric features.  The best part is that we’ve been told by the Development Team that there’s nothing they can’t fix.

Oh hubris.

Stay tuned as the Community Team sets out to destroy Commons, and possibly our jobs, so that you get the most out of your Commons experience.

Social Media App Spotlight: Selective Tweet Status

Hello Commons Community,

With the recent roll out of Google+ this may be a moot point, but I just wanted to share a new (to me) discovery for those who use Twitter and Facebook. Over the past few months, I’ve noticed a lot of folks ending their tweets with the hashtag: #fb. I assumed it was some type of reference to Facebook, perhaps notifying their twitter followers that they also had a Facebook account. I admit, I thought it a little strange that there never was a link to the person’s Facebook profile. Anyway, I decided that today was the day that I would find out exactly what the #fb hashtag was all about.

After a little searching around on the interwebs I found out that the hashtag is linked to a Facebook application called Selective Tweet Status that enables you to post a Twitter status update to your Facebook profile by adding the #fb hashtag to the end of your tweet. I thought this was a nice alternative to using a time-saving social media dashboard like Hootsuite or Seesmic or having to log into both Facebook and Twitter in order to post the same thing.

If you’re interested in using this app here’s how you do it:

  1. Log into Facebook.
  2. Enter “Selective Tweets” into the Facebook search bar and select the application.
  3. On the application page, enter your Twitter username and select Save.
  4. Allow the application to access your basic information and post to your wall.
  5. You’re golden!

Now, whenever you want to post to both Twitter and Facebook, all you need to do is include the #fb hashtag at the end of your tweet.

If you have a helpful interweb tool that you want others to know about please feel free to post about it in the comments below or add it to the Kitchen Sink Utilities wiki page.

The post Social Media App Spotlight: Selective Tweet Status appeared first on Commons Connect.

Skip to toolbar